
Cascading Style Sheets (CSS) are used by web designers to layout and format web pages.
Cascading Style Sheets solve a common problem with HTML which was originally designed to define the content of a document, but not the document presentation/layout.
The layout of the document was supposed to be taken care of by the browser,without using any formatting tags.
The content is defined by using tags like <h1>, <p>, <table>, which basically say “This is a header“, “This is a paragraph“, “This is a table” and so on.
In the early days of the web the principal browser vendors, Netscape and Microsoft, competed by adding support for new, proprietary tags (like the <font> tag and the colour attribute)to create high-impact Web pages.
These innovations were good for spurring the development of Web technology, but they created problems as well.
Consequently it became more and more difficult to create Web sites where the content of HTML documents was clearly separated from the document’s presentation, and that would be displayed correctly on any browser.
The World Wide Web Consortium (W3C) – the consortium responsible for standardizing HTML – created a language called Cascading Style Sheets, or CSS.
CSS, unlike HTML, is designed solely to define appearance as efficiently as possible.
It can exist either within HTML or as a linked document, letting developers separate a Web page’s content (marked up in HTML) from its presentation (defined by CSS).
Style sheets work in a similar fashion to templates: you define the style for a particular HTML element once (e.g. header tag <h1>), and then use it over and over on any number of Web pages.
If you want to change how an element looks, you just change the style; the element automatically changes wherever it appears on the site.
Before CSS, you had to change the element individually, each time it appeared. This meant that if it appeared on 100 pages then you needed to edit all 100 pages.
Style sheets let Web designers quickly create more consistent pages, and more consistent sites.
How Style Sheets are Implemented
There are 3 basic ways to add the functionality of Style Sheets
to a web page. They are:
1. Inline – Creating the elements for each HTML Tag. This will allow the same HTML Tag to have different styles on the same page.
2. Embedding – Creating the elements on the page itself that will affect every occurrence of an HTML Tag on that page.
3. Linking – Creating one page that defines the elements and is included in the pages that you want to affect.–Preferred and most common
The Linking Style is used when you want to use the same style on multiple pages, you can then use Embedding and/or Inline on specific pages that don’t fit the design style of the Linking Sheet.
Precedence and Inheritance
As the term Cascading Style Sheets implies, more than one style sheet can be used on the same document, with different levels of importance.
Generally styles from different style sheets merge together (cascade) into a virtual style.
However, If you define conflicting styles for the same HTML element, the innermost definition, that is, the one closest to the individual tag wins.
The order of precedence is Inline, Embedding, then Linking.
That is, Inline Style takes precedence over Embedding Style, which takes precedence over Linking Style.
There is a fourth style sheet which is set, not by the document author, but by the reader, and that is the browser default.
Taking this style sheet into consideration the order of precedence
is:
1. Inline Style (inside HTML element) .
2. Embedding Style Sheet (inside the <head> tag of the page).
3. External Style Sheet.
4. Browser default.
So, an inline style (inside an HTML element) has the highest priority, which means that it will override every style declared on the page inside the <head> tag, in an external style sheet, and in a browser (the default value).
Using CSS- Style Sheet Syntax
The CSS syntax is made up of three parts: a selector, a property and a value:
selector {property: value}
For example:
H1 {color: blue}
The selector is normally the HTML element/tag you wish to define (e.g. header tag <h1>), the property is the attribute you wish to change (e.g. color), and each property can take a value (e.g. blue).
The property and value are separated by a colon and surrounded by curly braces. If the value comprises multiple words (e.g. sans serif) then put quotes around the value:
p {font-family: “sans serif”}
You can also specify more than one property; each property should be separated by a semi-colon. For example to define a centre aligned paragraph, with a red text colour:
p {text-align:center;color:red}
To make the style definitions more readable, you can describe one property on each line, like this:
p
{
text-align: center;
color: black;
font-family: Arial, Helvetica, sans-serif;
}
The font-family property in the code above offers the browser several values to choose from; the browser will go down the line until it finds a typeface it recognizes.
The first item listed (Arial) is the preferred typeface, and the second item (Helvetica) is an alternate typeface in case the user’s system doesn’t have Arial.
The third item (sans-serif) is a generic style of font rather than a specific one–this is recommended as a last alternative because most systems have at least one typeface in that generic family.
If the browser doesn’t find any matches, it will use its default font.
Grouping
You can group selectors. Separate each selector with a comma. In the example below we have grouped all the header elements. Each header element will be green:
h1,h2,h3,h4,h5,h6
{
color: green
}
Other Selectors
A selector identifies the part of the document to which the formatting applies.
Any HTML element can be a selector, but sometimes you want to be more specific in your style definitions.
Suppose, for example, you have a table with many rows, and you want to format the rows in several different ways.
Using the <TR> element as your selector limits you to one style definition, which would make all the rows look alike.
This is where classes and IDs come in handy.
Once you define a class or ID, you can attach it to any HTML element within the document to apply a style, without limiting the element itself to a particular style.
The Class Selector
A class is defined by giving it a name (always preceded by a period) and adding the standard style definition of properties and values inside curly brackets:
.classname {Style definition}
With the class selector you can define different styles for the same type of HTML element.
Say that you would like to have two types of paragraphs in your document: one centre aligned paragraph in blue, and one centre aligned paragraph in red. Here is how you can do it with classes:
Defining:
.red-center {text-align: center;color: red}
.blue-center {text-align: center;color: blue}
Using:
In your HTML document you have to assign the class to the
paragraph element i.e. the HTML tag:
<p class=”red-center”>
This paragraph will be center aligned and red.
</p>
<p class=”blue-center”>
This paragraph will be center-aligned and blue.
</p>
The id Selector
IDs are used in basically the same way, except that they are preceded by a number sign (#) instead of a period:
#idname {Style definition}
However the id selector is different from the class selector in that an id selector always applies to only one element on a page whereas a class selector may apply to several elements.
Using an ID is like giving a selector a unique name, which comes in handy when working with scripts.
If you are not working with scripts the convention is to use classes instead of IDs as selectors.
The style rule below will match a p element that has the id value “red-center”:
Defining:
#red-center
{
text-align: center;
color: red
}
Using:
<p id=”red-center”>A paragraph which has the id selector “red-center” assigned</p>
CSS Classes vs Ids
Many beginners get confused between the difference between the selectors classes and ids, and are unsure which one to use.
Both selectors can be used with existing HTML tags.
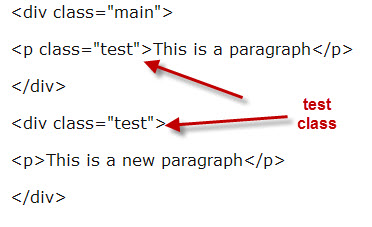
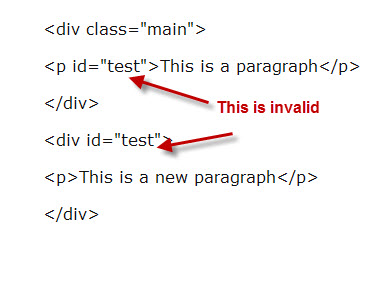
However a class can be used multiple times within a document while an id selector can only be used once. As an example:
This HTML code uses classes and is valid
This HTML code uses ids and is invalid
So if multiple elements need to be styled the same on a page then use the class selector. If a single element needs to be styled then you can use an id.
ID selectors tend to be used for layout elements like navigation as there is normally only one such element on a page.
The Id selector is also used in scripting, and can also be used as an anchor (named anchor) for linking.
Combining ID and Class selectors
An element can have one id and multiple class selectors. So
<p class=”test outline” id=”p1″>
is valid.
Note: the class= “test outline” defines two classes- test and outline.
Using Multiple Style Sheets
Because there are several places where a style can be defined it is possible to specify a style more than once.
If some properties have been set for the same selector in different style sheets then these will be combined.
If values conflict the one set closet to the selector will win.
So a property set in an external style sheet can be overridden in an internal style sheet which can be overridden by an inline style.
For example, an external style sheet has these properties for the h3 selector:
h3
{
color: blue;
text-align: left;
font-size: 8pt
}
And an internal style sheet has these properties for the h3 selector:
h3
{
text-align: right;
font-size: 18pt
}
If the page with the internal style sheet also links to the external style sheet the properties for h3 will be:
color: blue;
text-align: right;
font-size: 18pt
The colour is inherited from the external style sheet and the text-alignment and the font-size set in the external style sheet is replaced by the internal style sheet
Summary
Style sheets allow web designers to easily control the website layout and design.
Styles are normally saved in files external to your HTML documents.
External style sheets enable you to change the appearance and layout of all the pages in your Web site, just by editing a single CSS document.
A Web developer can define a style for each HTML element and apply it to as many Web pages as required.
To make a global change, change the style in the style sheet, and all elements in the Website are updated automatically.
Related Articles and Resources: